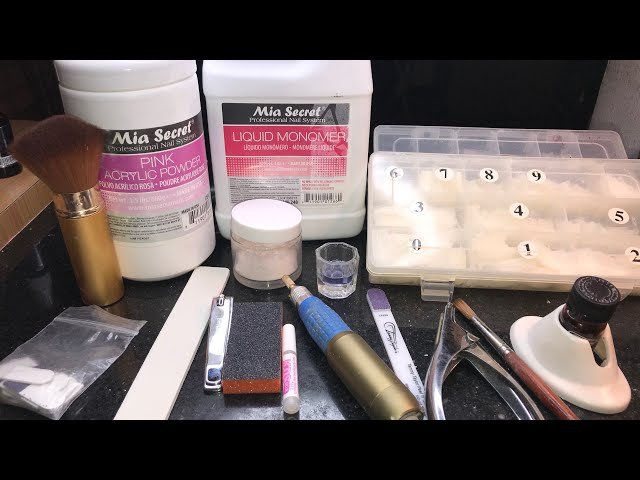
To do acrylic nails, you’ll need specific tools and materials for a flawless finish. Firstly, gather acrylic powder, liquid monomer, nail tips, a brush, buffer, and nail file. These essentials are the building blocks for creating stunning acrylic nail designs. Proper preparation and technique are key when it comes to achieving professional-looking acrylic nails. Dive into the world of nail art with confidence and the right supplies – that’s what you need to do acrylic nails.

What Do You Need to Do Acrylic Nails
Introduction to Acrylic Nails
Have you ever admired someone’s perfectly manicured nails and wondered how they achieve such a glamorous look? One popular way is by getting acrylic nails! Acrylic nails are artificial nail enhancements that are applied on top of your natural nails to give them extra strength and a beautiful appearance. In this article, we will explore everything you need to know about acrylic nails and the step-by-step process of how to do them yourself at home.
Materials Needed
To get started with acrylic nails, you will need a few essential materials. Here’s a list of what you’ll need:
Acrylic Nail Kit
The first thing you will need is an acrylic nail kit. These kits typically include acrylic powder, acrylic liquid (also known as monomer), a nail primer, nail glue, a nail buffer, nail tips, and a nail file. Make sure to choose a kit that suits beginners and includes all the necessary items.
Nail Prep Tools
You will also need some basic nail prep tools like a cuticle pusher, nail clippers, and a nail brush. These tools will help you prepare your nails before applying the acrylic.
UV/LED Lamp (Optional)
While not essential, having a UV or LED lamp can help in curing the acrylic quickly and efficiently. This step is optional but can make the process smoother.
Step-by-Step Guide
Now that you have all the materials ready, let’s walk through the step-by-step process of doing acrylic nails at home:
Step 1: Prepare Your Nails
Start by removing any old nail polish and shaping your nails with the nail file. Push back your cuticles using the cuticle pusher and trim your nails to the desired length.
Step 2: Apply Nail Tips (Optional)
If you want longer nails, you can apply nail tips at this stage. Simply glue the tips to the edge of your natural nails and trim them to your desired length.
Step 3: Apply Primer
Apply a small amount of nail primer to your natural nails. This will help the acrylic adhere better and prevent lifting.
Step 4: Mix Acrylic Powder and Liquid
Take a small dish and pour some acrylic liquid into it. Dip your acrylic brush into the liquid and then into the acrylic powder. Mix them together until you get a bead at the tip of the brush.
Step 5: Apply Acrylic Mixture
Starting from the middle of your nail, apply the acrylic mixture in a smooth, even layer. Use the brush to shape the acrylic and extend it to the desired length.
Step 6: Shape and Buff
Once the acrylic has dried, use a nail buffer to smooth out any rough edges and shape the nails to your liking.
Step 7: Apply Top Coat
Finish off by applying a top coat to seal the acrylic and give your nails a glossy finish. You can also cure the nails under a UV or LED lamp for better results.
Congratulations! You’ve now successfully completed your acrylic nails at home. With a bit of practice and the right materials, you can achieve professional-looking acrylic nails without leaving the comfort of your home. Remember to follow the steps carefully and take your time to perfect the process. Experiment with different colors and designs to create unique nail looks that showcase your style. Have fun pampering yourself and flaunting your fabulous acrylic nails!
💅🏼Acrylic Nail Tutorial – How To Apply Acrylic For Beginners 🎉📚
Frequently Asked Questions
1. What supplies are necessary to do acrylic nails at home?
To do acrylic nails at home, you will need acrylic powder, acrylic liquid (monomer), a brush specifically designed for acrylic application, nail tips or forms, nail file, buffer, cuticle pusher, and a UV or LED lamp for curing the nails.
2. How do you prepare your natural nails for acrylic application?
First, start by removing any existing nail polish and shaping your nails using a nail file. Push back your cuticles gently using a cuticle pusher. Lightly buff the surface of your nails to remove shine and create a rough texture for better adhesion of the acrylic. Clean your nails with a nail cleanser or rubbing alcohol to remove any oils or residues.
3. What is the process for applying acrylic nails?
Begin by applying a thin layer of acrylic primer to your nails to promote adhesion. Next, dip the brush in acrylic liquid, then into acrylic powder to create a ball. Place the ball on the nail and shape it using the brush. Repeat this process for each nail, ensuring smooth application and even thickness. Once done, let the acrylic dry and cure under the UV or LED lamp.
Final Thoughts
In conclusion, to do acrylic nails, you will need acrylic powder, liquid monomer, a nail brush, nail tips, a nail file, and a UV or LED lamp. Begin by prepping the nails, applying the nail tips, mixing the acrylic powder with the liquid monomer, and sculpting the nail. Finish by filing, shaping, and buffing the acrylic nails to perfection. Remember, practice makes perfect when it comes to mastering the art of doing acrylic nails.